|
|
VLAB Home |
|
Panel Manager is a vlab system program used to control parameters during experiments. It displays and makes it possible to manipulate a user-defined control panel. The panel communicates with an application such as a simulation program, by sending messages which edit the applications data file (refer to Interfacing with an Application).

Panel Manager runs as a completely separate process from the application. It inputs the panel definition from a file, and uses this information to open a window for the panel, create a popup menu, and display items, such as sliders and buttons, which are specified by the user.
Panel Manager V4.0 for Linux has the additional feature of a built-in Panel Editor. The panel definition files can be edited interactively using the Panel Editor, which enables the user to grab and move panel items, as well as edit labels, add pages, resize the panel and more.
> panel [optional_filename]
Creates a new panel, with optional file name.
> panel [panel_definition_file]
Opens existing panel.
> panel -m [colourmap_file] [panel_definition_file]
Opens existing panel with specified colourmap.
(A colourmap specification in the panel definition file overrides the command line argument.)
A panel definition file can also be loaded in Edit Mode (see Panel Editor below).
Panel items send a message to stout when activated. This output can be piped to a Parameter Editor (awkped or ped) as shown below. (See also Interfacing with an Application).
> panel [panel_definition_file] | awkped [application_data_file]
> panel [panel_definition_file] | ped [application_data_ file]
The panel displays a collection of user-defined interactive panel items, including sliders, buttons, button groups and labels. The user determines the colour scheme and font, the arrangement of the items on the panel, and the size of the panel.
| Note: | If no colourmap is specified, neither in the panel definition file nor at the command line (see Panel Manager Execution), the colours will default to black background with white borders and text. Buttons default to blue, and sliders to red.
Also, if font is not specified in the panel definition file, a default font is used. See figure 2 below for an example of default settings. |
 |
 |
The panel items shown in figure 2, from top to bottom, are: two buttons in a button group ('Line' and 'Polygon'), a label ('Axiom'), a slider ('Derivations'), and the page label ('Shell').
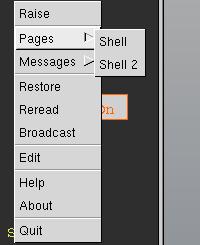
The popup menu is activated by pressing the right mouse anywhere on the panel. Most of the popup menu options in figure 3 appear the same for all panels. Pages and Messages are the exceptions. They are sub-menus and are dependant on the contents of the panel definition file. They appear in table 1 below and are marked with an asterick.
The Panel Manager operates in two modes: Execute Mode and Edit Mode. The default mode is Execute Mode, which enables the user to manipulate the control panel items. In Edit Mode, the Panel Editor window is open and the user is able to edit and save the panel definition file interactively.
Refer to Panel Editor for more documentation of Edit Mode functionality.
A slightly different popup menu is used in each mode. The following figure 3 is an example of the popup menu in Execute Mode. (Refer to Panel Editor for an example of the popup menu in Edit Mode).
|
Figure 3 - Popup menu in Execute Mode. |
Table 1 - Details of Panel Manager Popup Menu, in Execute Mode.
|
A label is simply a line of text that may provide extra information about the panel or other panel items.
There is no user interaction with labels.
Buttons (and sliders) contain their own labels that display their name (and value).
A slider provides a means for the user to set an integer value between some preset minimum and maximum.
The current value appears above the slider in the value label.
The slider name appears in the title label below the slider.
Activating the slider:
A button can be either bistable (toggle ON/OFF) or monostable (ON while pressed, OFF while released).
A button which is OFF is either transparent or coloured, and button which is ON is coloured differently than the OFF colour.
| Note: | Button colours are user-defined, as for all panel items. |
Activating the button:
Button groups are sets of mutually exclusive bistable toggle buttons (it makes little sense to use monostable buttons in groups).
If any button is activated (see Buttons above), it becomes ON (even if it was ON previously) and the others are turned OFF.
A line is drawn around the outer limits of all of the buttons in the group to display the button group as a unit.
| Note: | Buttons in groups are referenced by name in the panel definition file. Therefore, buttons should have unique names. Buttons with the same name cannot be added to a group using the Panel Editor. |
Messages may also be sent via user-defined menu items.
A menu item is activated each time it is selected from the popup menu.
Activating the menu item:
| Note: | The Messages sub-menu does not exist if there are no menu items in the panel definition file. |
A panel may have one or more pages, each with a unique set of control panel items. If more than one page is used, the pages are switched between using the popup menu.
Activating the page:
| Note: | The Pages sub-menu does not exist if there are less than two pages in the panel definition file. |
Panel definition files may be created/edited manually, or by using the panel editor (refer to Panel Editor).
Each property is defined in sequence, according to the syntax shown in table 2 below.
Each line in the file must begin with a heading, followed by a colon and a space separation.
The first group of lines refers to the panel properties: panel name:, colourmap:*, font:* (raw name), background:* colour, and size: (width then height), and is followed by a line of white space and then a list of panel items. Panel items are seperated by a line of white space.
A panel may be divided into several pages, each containing any number of controls.
Definition for all panel items for a page must follow the definition of the PAGE item.
The specifications for the current page end when a new page definition is encountered.
If page definitions are used in the panel definition file, items specified before the first page are ignored.
Syntax for all item types is shown in the following table 2.
type: is the first property defined for each item, and the succeeding properties depend on the item type. The type, eg. LABEL, is always all capitalized.
If origin: is defined for the item, specify x-coordinate then y-coordinate.
If color: is defined for the item, it is the outline / text colour.
If the heading is colors:, the second colour is the fill / on colour.
If tricolor:
is used, the third colour is the off colour.
| *Note: |
The only optional properties are the panel colourmap and the panel font. If either of these two lines are missing, the property will simply be set to default. If the colourmap is not specified, colour indices are irrelevent and panel property background and item property color can be left out or included. A colourmap can also be specified at the command line if the corresponding indices appear in the file (refer to Panel Manager Execution) . |
| panel name: L-System colourmap: map1.map font: -adobe-courier-medium-r-normal--*-140-79-81-m-*-iso8859-1 background: 29 size: 161 249 type: PAGE type: BUTTON type: BUTTON type: GROUP |
type: LABEL name: Axiom color: 17 origin: 58 126 type: SLIDER type: PAGE type: BUTTON type: MENU |
| Note: |
In the file, the US-English spelling of colour is used for the headings color: and colors:, but not for the heading colourmap:. A BUTTON item can have two or three colours, which is specified by the heading tricolor: (3) or colors: (2). A GROUP item is defined after all buttons within it are defined. A list of the buttons within the group is followed by the ENDGROUP flag. Items are referenced by name in the file. It is a good idea to use a unique name for each item, and it is in fact necessary in the case of buttons in groups. |
Simulation programs in the virtual laboratory are assumed to obtain their initial parameter values from data files. The Panel Manager can be interfaced to any application that has the ability to reread its data files. The communication flow in such an interface is shown in figure 1.
The advantage of using a parameter editor is that it is the only component that needs to be tailored when connecting panels to arbitrary applications.
A parameter editor interprets messages from the panel manager and edits the corresponding parameter in the appropriate data file.
Two parameter editors are commonly used in the vlab system, ped and awkped.
The modified data file may subsequently be read again by the application program. Thus the steps involved in modification of the parameters are:
A specifications file or the command line can be used to interface a panel with an application:
> panel [panel_definition_file] | awkped [application_data_file]
> panel [panel_definition_file] | ped [application_data_file]


Two parameter editors are commonly used in the vlab system.
Parameter editor using ed.
Usage:
ped file_name
Description:
Ped interprets messages of the following format from stdin:
n line field scale value o line stringline: the line number to be edited,
Normally this input is piped to ped from the panel manager.
Ped uses this input to edit a parameter file containing lines of the format:
        parameter-name: value1 [, value2 [, value3 ]]
        parameter-name: string
where value1, value2, value3 are integer or floating point numbers, and string is the character string on or off.
Example:
If ped reads the message:
n 1 2 -2 459
and the first line of the parameter file is:
light direction: 10, 20, 30
then after the edit, the resulting line will become:
light direction: 10, 4.59, 30
If ped reads the message:
o 3 off
and the third line of the parameter file is:
switch4: on
then after the edit, the resulting line will become:
switch4: off
Parameter file editor using awk.
Usage:
awkped file_name
Description:
Processes stdin input messages to edit the file specified on the command line using awk. The result then replaces the original file.
awkped interprets messages of two types of formats from stdin:
Format type 1 is the following :
line field value scaleline: the line number to be edited,
Normally this input is piped to awkped from the panel manager.
Awkped uses this input to edit a parameter file containing a line of format type 1:
parameter-name: value1 [, value2 [, value3 ]]
where value1, value2, value3 are integer or floating point numbers.
Example 1:
If awkped reads the message:
1 2 459 100
and the first line of the parameter file is:
light direction: 10, 20, 30
then after the edit, the resulting line will become:
light direction: 10, 4.59, 30
Format type 2 is the following :
d string value scalestring: the name of the field - as used in a #define statement in a data file,
Awkped uses this input to edit a parameter file containing lines of format type 2:
#define string value1
where value1 is an integer or floating point number and string is any character string ( which specifies the name of a field).
Example 2:
If awkped reads the message:
d direction 32 0.1
and the parameter file contains the line:
#define direction 23.0
then after the edit, the resulting parameter file will contain:
#define direction 320.0
L. Mercer. The Virtual laboratory. Master's thesis, University of Regina, Regina, Canada, 1991.
L. Mercer, P. Prusinkiewicz, J. Hanan. The Concept and Design of a Virtual Laboratory. In Graphics Interface '90 Conference proceedings, pages 149-155. Canadian Information Processing Society, 1990.
Joanne Penner - Panel Manager and Editor Implementation and Documentation, vL1.0
L. Mercer, I. Hernadi, P. Prusinkiewicz - Parameter Editors ped and awkped Implementation and Documentation
Versions of Panel Manager for SGI used the SGI colourmap space. Indices in panel definition files referred to hardware memory locations in this space. Indices range from 0 to 4096.
Panel Manager vL1.0 is compatible with any old panel definition files, so long as all syntax conforms to the Panel Definition File Format, outlined above.
Optionally, colourmap and font can be specified in the panel definition file.
Panel Manager vL1.0 requires that the colourmap be specified explicitly, either in the panel definition file, or in the object's specifications file (or at the command line). (See also Panel Manager Execution).
Following are two examples of alternative ways to specify a colourmap for a panel.
| Lines similar to the following may appear in previous specifications files. |
|
| Modify the command to contain the "-m [colourmapfile]" flag, as shown below. |
|
| Lines similar to the following may appear at the beginning of previous panel definition files. |
background: 23 size: 210 80 |
| Add the heading "colourmap: [colourmapfile]" on the second line of the panel definition file, as shown below. |
colourmap: mypanel.map background: 23 size: 210 80 |
| Note: |
Definition of a colourmap in the panel definition file overrides that on the command line or in the specifications file. |
The executable name, panel, is identical to a command that exists in Linux.
To run the Panel Manager, make sure that the command panel refers to <vlabdir>/bin/i686/panel.
|
|
VLAB Home |
|