
It is necessary to add a new rule to the rule base when it is determined that the existing rule base fails to provide an acceptable rule or set of rules set for the parameter variations required for some combination of postures. Adding new rules often involves adding new Transition Prototypes and Equation Prototypes, which are invoked when the rules are triggered by the input parsing mechanism. The rule must be defined, and the Equations and Transition Profiles for all transitions and time points must be selected or created and named.
For simpler situations, such as when it is required to produce a systematic change in timing of events or the trajectory of articulations in order to generate systematically varying stimuli for psychophysical experimentation, simply adding new timing symbols governed by new Equations or adding new Transition Prototypes, using the Prototype Manager, as appropriate, may be all that is required. The timing symbols can then be substituted for the regular symbols, in a systematic way, to create a succession of stimuli in which all factors are closely controlled. Thus, for example, the release burst, aspiration, and voicing onset may be systematically varied as part of an experiment on the effect of changes in relative timing of release noise and voicing onset. If, on the other hand, the trajectory of articulations were being investigated (as in studying the effect of ageing on articulation), then new Transition Prototypes would be required, and could be systematically substituted for the regular prototypes in successive stimulus synthesis by editing the rule to invoke each in turn. As previously noted, this process should be somewhat automated to make it more convenient, but this has not yet been done.
This section covers the basic requirements for performing the above tasks for the purposes stated, or for similar purposes.
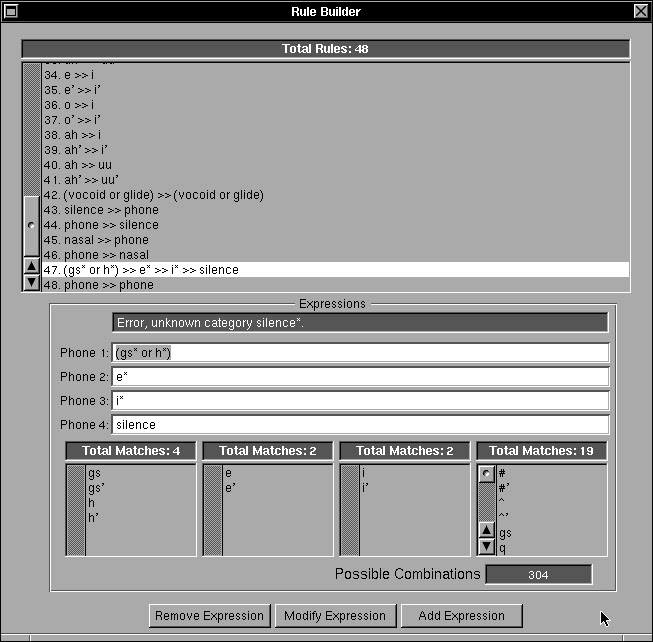
Fig 1: The Rule Builder window: adding a new rule specific to the Canadian "Eh!"
(Original Rule 1 highlighted, with the four elements of the new rule entered in the appropriate "Expressions" fields. Note the "Total Matches" windows provide a listing of the posture matching each element, and the total number of combinations is provided)
Figure 1 shows the Rule Builder window with Rule 1 of the original diphones.monet database highlighted. For demonstration purposes, a new rule is in the process of being added to cover the correct Canadian pronunciation of "Eh!". This we will suppose requires (for the first time in this database development) a Tetraphone -- which means a rule able to consume four postures. The new rule thus has four elements. These are shown where they have been entered in the four text fields in the Expressions area of the Rule Builder window. Four sub-windows in this area show, for each element, which of the defined postures matches the specified element, for each of the four positions, and a further field indicates the total number of combinations. The Add Expression button is in the process of being clicked to add the rule.
Note that the top field in the same area provides feedback. The user wrongly typed "silence*" in the fourth field (there is no such thing as a "marked silence" only "unmarked silence", so the wild card "*" did not match the elements in the database.
Fig 2: The default insertion position for the new rule In Figure 2, the new rule has been added and the user has scrolled down to the end of the ordered list of rules. It can be seen that the new rule has been inserted in the penultimate position on the list. The last rule in the list is always the catch-all rule "phone >> phone" whose position cannot be changed.
The rules are ordered from the more specific to the more general. A rule that is intended to cover just one word could hardly be more specific, so it is necessary to move this new rule to the number 1 position. In general, new rules are placed in such a way that they catch their intended targets before the matching process gets down to a more general and less suitable rule. Ordering the rules is an important, but fairly obvious part of rule development.
Fig 3: The Rule Inspector showing the Rule Duration assigned by default Figure 3 shows the inspector panel has become a Rule Inspector. The Equations selection has been selected from the pull-down menu, which shows the equations governing the basic framework for this rule. These have been assigned default values. Double clicking on the Rule Duration equation displays the category and equation name that governs Rule Duration. This can easily be changed by choosing a different equation name, perhaps from a different category. A new timing symbol could be defined, and the governing equation created. A complete new category could be defined for a collection of new equations. These matters are covered below.
At this point, it is worth emphasising that whenever something new is defined, default values are assigned to its attributes so that the new entity can be used immediately. The attributes may then be modified until the new entity it meets whatever requirements are necessary. Also, as noted in the main body of the MONET manual, the actual usage of equations, transition prototypes and the like can be determined by examining the relevant inspector. In some inspector views a list of the usage is obtained by the Usage pull-down selection, in others the names of the elements are in bold if they are used, and in normal font if they are not used. Thus one would expect all equation and prototype symbols named "dud#" to be in normal font, not bold, since they have been renamed because they didn't work and (in the current MONET) could not be removed.
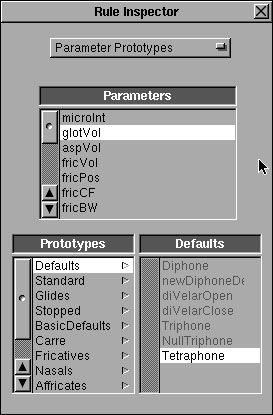
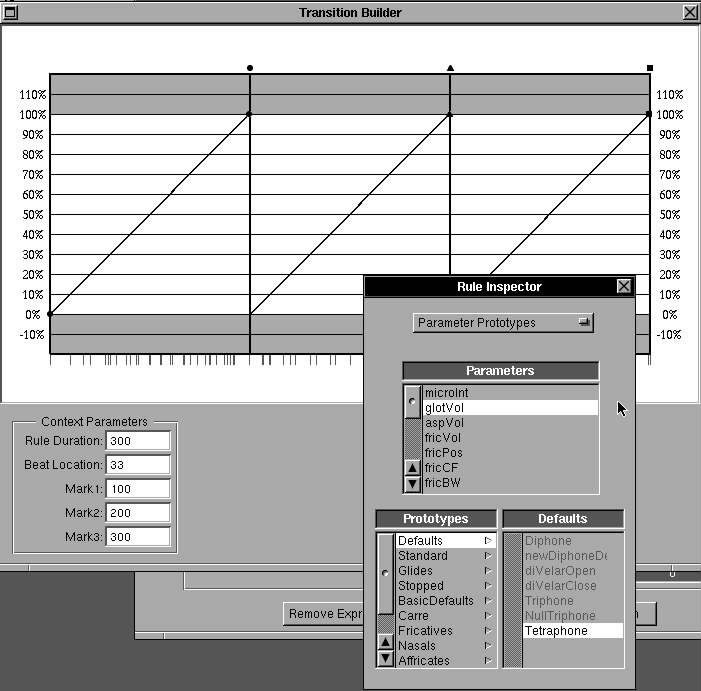
Fig 4: The Rule Inspector showing the default transition profile assigned for Glottal Volume In Figure 4, the inspector pull-down selection for Paramater Prototypes has been selected and the parameter glotVol has been highlighted. The lower window shows the name of the default prototype assigned -- Tetraphone in the category Defaults -- for controlling the Glottal Volume. Double clicking on the name of the parameter glotVol brings up the Transition Builder window and shows the form of the parameter control template referred to, as shown in Figure 8.
Note that the default control template (prototype) is very simple, and simply defines linear interpolation from each posture target to the next. There is no distinction between the quasi-steady state (qss) regions and the transitional regions. One reason the template is so simple is that is has not been used before, so it has never been made more realistic. However, it would allow MONET to synthesise an utterance within which this new rule applied without crashing. The template could easily be edited to be more realistic, or a new template, specific to this rule (and any others where it proved appropriate), could easily be created. The elements of such a process appear below, in association with Figures 8 through 11.
Fig 5: The Rule Inspector, showing the comment created for the new rule
Figure 5 shows the inspector with Comment selected from the pull-down menu. A suitable comment has been entered by typing it into the text field and hitting the Set button.
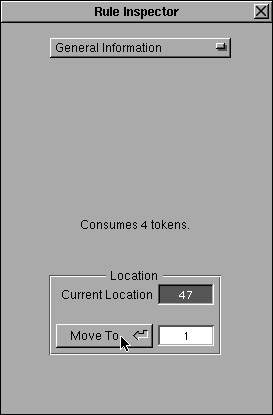
Figure 6 shows the Rule Inspector with General Information selected from the pull-down menu. The inspector tells us that the selected rule consumes 4 tokens (each token refers to a posture or category), and that the current position is rule number 47. The user has entered "1" in the text field associated with Move To and is just clicking the button to reposition the rule.
Fig 7: The Rule Inspector, showing that the new rule has been repositioned, as directed
By scrolling the Rule BuilderWindow, the user can verify that the new rule has been repositioned and is now rule number 1. It will be the first rule applied when an input string is being parsed. The inspector panel also shows the current rule position as rule number 1.
With the Rule Builder window as key window, the inspector is a Rule Inspector. Highlighting the new rule, and choosing Parameter Prototypes from the pull-down menu on the inspector allows the user to see what Transition Profile governs the movement of each parameter. A list of parameters appears in the sub-window in the inspector panel. As an example, double-clicking glotVol brings up the profile associated with the parameter governing glottal volume. This is not quite the same as loudness or acoustic intensity because what actually radiates from the nose and lips depends on a variety of factors -- glottal volume is the energy input to the tube from the larynx. However, it is an important component of the radiated energy. The profile is Tetraphone in the category Defaults.
As already noted, the glottal volume transition profile is over-simplified because it has never been used (we are constructing the first Tetraphone rule in the database. The user can either modify this default (good because it is so unrepresentative; bad because, being simple, it provides a general basis for the creation of new Tetraphone profiles) or create a new profile. The better choice is to leave the default as it is and create a new profile. In any case, the variation in glottal volume will be very different to the variation in other parameters.
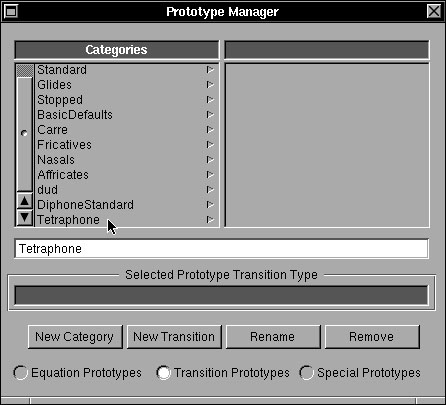
Fig 9: Defining a new Transition Prototype category In Figure 9, the user has begun the process of defining a new category and symbol names for tetraphone parameter profiles. The Transition Prototype radio button has been selected, the category name Tetraphone typed into the text field, and the New Category button clicked.
Fig 10: Naming/creating a new Transition Prototype
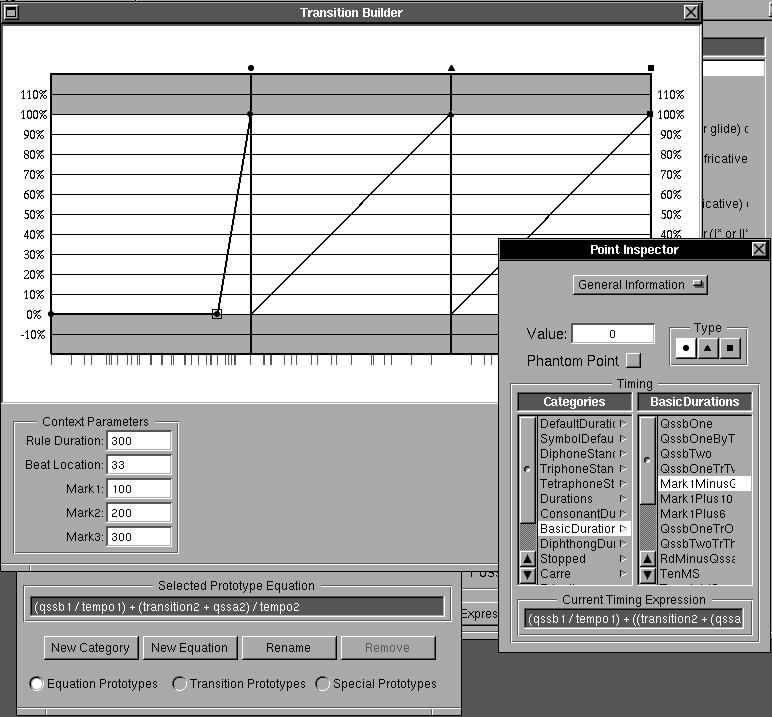
In Figure 10, which shows a portion of the whole screen, the Transition Builder, Prototype Manager and Prototype Transition Inspector can all be clearly seen. The Rule Builder window is also there, but is mostly obscured by the other items. The inspector shows that the current transition template (profile) is of type Tetraphone and the Prototype Manager shows that a new category (Tetraphone was created, and a new symbol within that category -- GlotVolForEh -- has just been created by double-clicking on the new symbol in the Prototype Manager. This brings up the new profile the user is creating to handle the glottal volume parameter for the new rule that is specific to the phone (posture) combination for "Eh!". Initially the prototype will be a diphone template. Selecting the Tetraphone radio button on the Transition Prototype Inspector after selecting General Information changes the template to a simple tetraphone form (i.e. no shaping points).
Figure 11 shows the results of starting to create a custom template for glottal volume under the new name. The template may be of general use, or it may be restricted purely to the one highly specific rule for "Eh!", but the process of customising it from the general template is the same. Each point is added by double clicking on the template percentage change graph; its value is assigned by typing it in to the field in the inspector -- in this case, its value has been set to "0"; and its timing is determined by selecting an existing time point that has an appropriate value -- in this case, Mark1MinusQssa2By2, an exactly descriptive name. Mark1 is the nominal time when the target for posture 2 is achieved, Mark2 posture 3, and Rule Duration is the nominal time for the last posture. Since "Eh!" is an utterance that starts abruptly, with a glottal stop, the voicing onset has been made quite sharp, and close to the nominal steady state time (half the quasi-steady-state time away. This is a first cut. If good data were available, this could be used to determine the time. If the initial settings did not produce the correct result, the settings could easily be changed. If the process reached a dead end, the process could be terminated, the profile labelled "dud#" and the process retried. Better editing (the ability to remove points or complete profiles entirely) is a needed improvement, but the current system lacks this simple convenience.
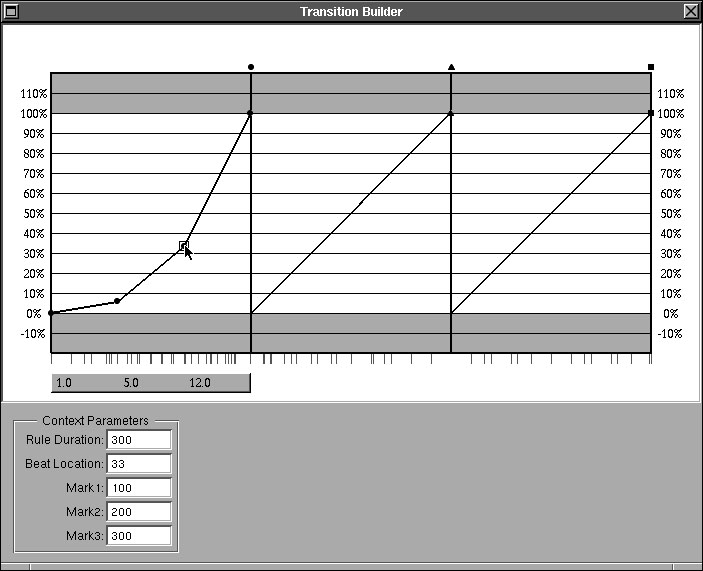
As previously noted, the values assigned to the points in the transition graph (profile) can be determined by imposing a slope ratio on the graph segments, rather than assigning absolute percentage values to the points.
The number of points needed to achieve the control required is determined, and the points are added as before. A "box" is then drawn around the points using the cursor to define the first corner of the box by clicking, followed by dragging to the diagonally opposite corner of the box. On releasing the mouse button, the points enclosed will all be selected. The Edit Menu selection Group Points for Slope Ratio is then chosen. A set of fields appear below the selected points. Clicking on one of these fields causes it to change colour and a value may then be typed in, followed by the "Enter" key. In the figure, the three part slope ratio has been defined as 1:5:12. The point values are now set automatically to achieve the desired slope ratios and cannot be changed by entering a new value, except for the first or last point in a series.
If the fields are too close together, the scheme still works, but some of the slope ratio numbers may be super-imposed, after entry, which is annoying and should be fixed. The fields should also have separator lines to provide confidence that they have been set up as intended, and to provide a better target for access for initial entry and later editing.
Additional points can be added to the profile. Profiles for other parameters and special parameters can be created and edited using the same processes.
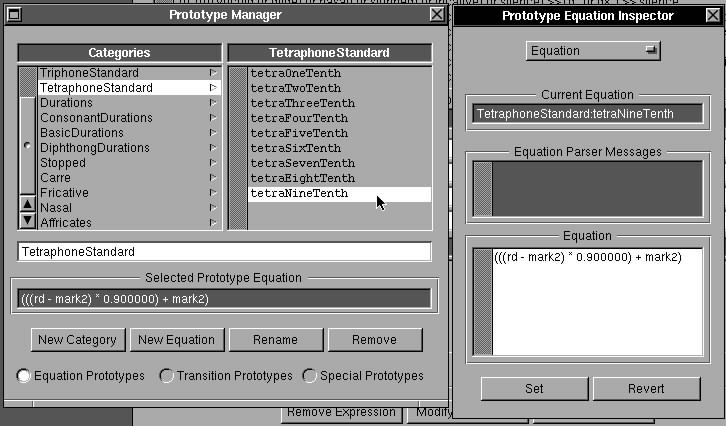
In Figure 12, the Prototype Manager shows the Equation categories with TetraphoneStandard selected and tetraNineTenth selected within that category. The governing equation shows in the field on the manager, and in the text field in the Equation Inspector. The equation could be edited.
The last category in the list is Affricates.
In Figure 13, the user has added another category by typing the name "GnuStandard" into the text field of the Equation Manager, clicking the New Category button, typing the equation name "GnuOne" into the text field and clicking the New Equation button. The user then typed the governing equation into the inspector's text field and hit "Enter" (note that the "Set" button does not currently work). This is all that is required to identify a new equation by a new name in a new category. The equation can now be selected for use in appropriate places, and edited to modify the defined time.
Page last updated 04-03-21.


Please email any comments or questions about this paper to
the author (David Hill)