|
|
VLAB Home |
|
M-Edit is a material editor that allows the user to define up to 256 materials. Material properties include ambient, diffuse, specular, emissive, shininess and transparency. A gallery displays the materials on spheres. Materials can be loaded from a .mat file to specify surface materials on model objects, and can be rendered in CPFG for example.
Execute M-Edit using the following arguments in an object's specifications file or at the command line:
> medit
Open an empty gallery for up to 256 materials.
> medit [filename.mat] ...
Opens the specified material file(s).
If the file does not exist, creates a new file with specified name.
If a list of material files is specified, each is open in a separate application window.
> medit ... -w [width] [height]
Opens M-Edit with specified dimensions.
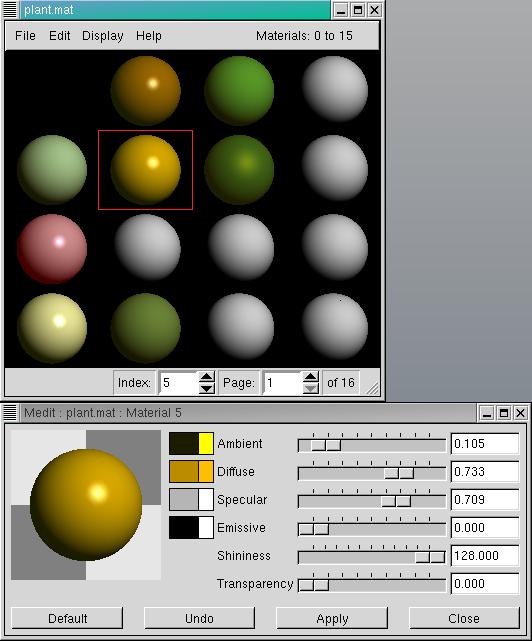
When the program starts, the Material Gallery is opened exhibiting the first 16 of the 256 materials in the gallery. (Refer to figure 1 for a sample Material Gallery.)
Index 0 is in the upper left corner, with consecutive entries vertically, top to bottom. A label displays the current range of indices being displayed in the upper right corner of the Material Gallery. The current index and page are displayed in the lower right corner. Various messages are displayed in the lower left corner, reflecting the actions of the user.
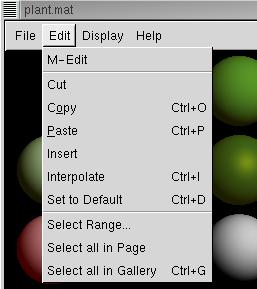
The menu bar is located in the upper left corner of the Material Gallery. All actions and options are available through the menu bar (refer to figure 2 for menu options and shortcuts). To access the menu bar, press the left mouse button on the desired menu: File, Edit, Display or Help.
The spheres in the Material Gallery are selectable using the left mouse button (refer to Selection below).
The M-Edit Dialog can be opened by double-clicking the left mouse on a sphere (index 5 in figure 1 below).

A single material index is selected by clicking the left mouse button on the entry, or by entering the index in the first spinbox in the lower right corner.
A range of indices can be selected by pressing the left mouse on the lesser index, and dragging to the greater index. A range can also be selected by selecting Edit from the menu bar (see figure 2 above), and then selecting Select Range..., which opens a dialog box to input the start index and end index or number of indices to be selected.
All materials on the current page, or all materials in the gallery, can be selected by selecting Edit from the menu bar, then Select all in Page or Select all in Gallery (see figure 2 above).
Selected indices are outlined in red. All others are not outlined.
The Material Gallery is organized into pages displaying consective material indices.
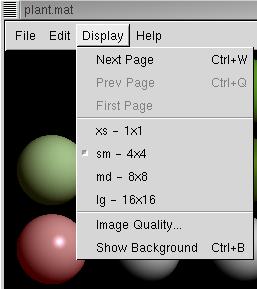
To display more or less spheres per page, select Display from the menu bar at the top of the window, then select the desired page size:1, 4x4, 8x8, 16x16 (see figure 2 above).
A page may be jumped to by entering the page number in the second spinbox in the lower right corner, or by selecting Display from the menu bar and then selecting Next Page, Previous Page or First Page (see figure 1 above). The number of pages, as well as the page a particular material falls on, depends on the page size. The indices materials that are displayed on the current page are shown in the upper right corner of the window. When a page is changed, the current selected index is not affected.
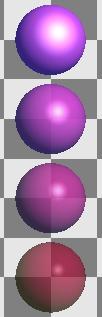
The background is black by default. Sometimes, it is useful to draw an image behind the spheres, for example to show transparency. To change the background to a checkerboard pattern, select Display from the menu bar, then select Show Background (see figure 5 for an example).
To return to a solid black background, select this option again. The display background on the M-Edit Dialog is always checkerboard (see figure 1 above).
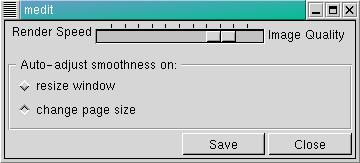
The spheres are rendered as a polygon mesh between vertices. The rendering speed varies inversely to the smoothness of the spheres. To adjust the smoothness, and to set the auto-adjustment of the smoothness, select Display from the menu bar, then select Image Quality... to edit the smoothenss parameters in the Image Quality dialog (see figure 3 below). The spheres in the gallery immediately reflect the changes. Once the display is satisfactory, the parameters may be written to the configuration file by clicking the button marked Save. This will be the default setting for future sessions.
The Popup Menu is activated by pressing the right mouse button anywhere on the Material Gallery. The popup menu contains actions to be performed on the selection.
| Note: | The same options are available by selecting Edit from the menu bar. |
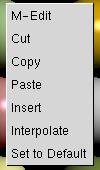
Material properties can be interpolated over a selected a range of indices, from Index A to Index B (see Selection above). After a range of indices is selected, activate the popup menu by pressing the right mouse on the Material Gallery and then select Interpolate.
All material properties that differ from Index A to Index B are interpolated (includes ambient, diffuse, specular, and emissive values and colours, and shininess and transparency values).
| Note: | There is no way to limit which properties are interpolated; they all are. |
The M-Edit Dialog is opened for the selected material (or a range of materials) by:
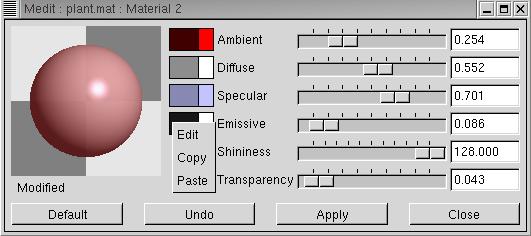
A preview of the selected sphere is displayed on the left of the M-Edit Dialog (see figure 6 above). The material properties ambient, diffuse, specular, emissive, shininess, and transparency can be edited using the sliders or by entering a value in the edit boxes to the right of the sliders.
| Note: | The return key must be pressed after editing in the boxes. |
The left side of the colour swatch displays the actual colour at the current value of the material property. The smaller section on the right displays the full intensity of the colour. If the material property has a value of 0, the full intensity is white, and the actual colour is black.
The colour swatch popup menu is activated by pressing the right mouse button anywhere on the colour swatch.
The colour of ambient, diffuse, specular and emissive can be edited with the HSV-RGB Colour Picker. To open the colour picker:
The full intensity of the colour can be copied and pasted to another colour swatch on the dialog, using the popup menu actions.
Once the material has been modified, a noticification label appears below the preview on the M-Edit Dialog (see figure 6 above). Modifications are not immediately reflected in the gallery. Selection and menu options are disabled in the gallery while the material is modified.
If a material is modified, the user must click the left mouse on:
| Note: | After clicking Apply, the changes can still be undone by clicking Undo, unless another material index is selected. Once a new material index is selected, the previous index remains as it appears in the Material Gallery (ie, all changes are set and cannot be undone). |
If a range of materials is selected for editing, the lesser index is shown in the preview. If Apply is clicked, all materials in the range will be set to the material shown in the preview.
The HSV-RGB Colour Picker is invoked by clicking the left mouse over a colour swatch, or by activating the colour swatch popup menu and selecting the option Edit from the popup menu (refer to Colour Swatches above).
The colour being selected is the actual colour (rather than the full intensity).
The intensity of the material property can be adjusted by:
The colours HSV or RGB values can be adjusted using the sliders on the left side of the dialog, or by entering the value in the edit boxes to the right of the sliders.
| Note: | The return key must be pressed after editing in the boxes. |
The hue and saturation of the colour can be selected on the rainbow colour wheel with the mouse by pressing the left mouse button to select a colour, and moving the mouse to adjust the selection. The hue line and saturation circle are drawn to aid in the selection.
The large box below the colour wheel shows the current selection. The selection is automatically applied.
The smaller box below the colour value slider shows the original colour. To revert to this colour, click the left mouse inside this box.
If the colour picker is closed, the material property colour remains as it appears in the colour swatch on the M-Edit Dialog.

M-Edit handles material files, with a .mat extension. These same material files can be used in other applications, like CPFG.
Table 1 contains a list of the file options available and what each does. Refer to figure 2 above for menu bar and shortcuts.
| New | Opens a new Material Gallery in the current VLAB Material Editor application. |
| New Window | Opens a new Material Gallery in a new VLAB Material Editor application window. |
| Load... | Opens a file dialog in which the user can select an existing file to load in the current VLAB Material Editor. |
| Load Window... | Opens a file dialog in which the user can select an existing file to load in a newVLAB Material Editor application window. |
| Save |
Saves the current material file. If no file has been specified, a file dialog is opened. |
| Save as... | Opens a file dialog in which the user can specify a new file to save the current material file as. |
| Rereads the material file as it was last saved and restores the materials in the gallery. |
Joanne Penner - M-Edit Implementation and Documentation, vL1.0
|
|
VLAB Home |
|