|
|
VLAB Home |
|
Snapicon is a VLAB tool for taking snapshots of objects on the computer screen. The main utility is creating the icon file for an object in the OOFS database. Snapicon can also be conveniently used for taking quick action-shots of experiments. As the frame can be placed anywhere on the desktop and can be freely resized, there is never a need to crop the image in a seperate editing program. Nine image file formats are supported as well. Snapicon can show a preview of the snapshot, so the user can decide if it is satisfactory before saving. As a point of interest, Snapicon was used to capture all of the screenshots used in the VLAB for Linux 1.0 documentation.
Snapicon can be executed from the command line using the following command (no arguments):
> snapicon
Snapicon is more commonly invoked from within the Object Manager, through the popup menu. Refer to Snapping Icons in VLAB.
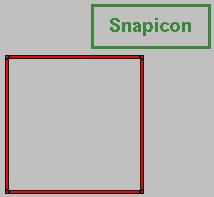
Snapicon consists of a small green and grey applet labelled Snapicon and a red frame for centering around the desired image on the screen. Figure 1 below shows a snapshot of Snapicon.
Once the frame is placed, a snapshot is taken by depressing the SHIFT key while clicking the left mouse button anywhere on the applet, inside the green border. This process does not cause Snapicon to take focus on the desktop.
Applet |
Frame |
|
 |
Left button
|
Left Button
|
 |
Right Button
|
Right button
|
The popup menu is invoked by pressing the right mouse anywhere on the green and grey applet.
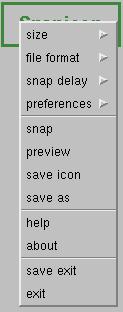
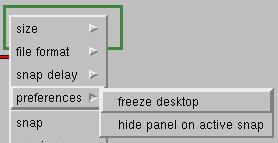
Size, File Format, Snap Delay and Preferences must be set before snapping the image.
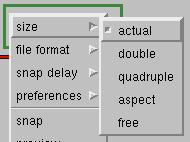
There are three preset sizes: actual, double and quadruple. The typical size for an object's icon image file is actual.
To manually resize the frame, select aspect or free. Select aspect to maintain the aspect ratio of width to height. The frame can be resized by clicking and dragging a corner with the left mouse. Select free to allow for any dimension rectangular frame. Click and drag a side to increase width, the top or bottom to increase height or a corner to adjust both simultaneously.
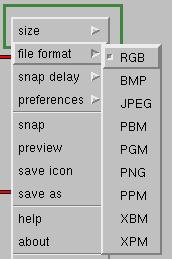
The following figure shows all of the supported image file formats.
Snap delay is a short time waited to allow for redraw before snapping. Depending on the complexity of the model and on hardware limitations, redraw rate varies. Select long delay for slow redraw, and short delay for fast redraw. By default, delay time is normal. The following figure shows the three snap delay settings.

Toggle the freeze desktop option to switch between Active Snap and Frozen Snap (refer to Snap).
Toggle the hide panel on active snap option to hide / not hide the green and grey Snapicon applet while the snapshot is being taken.
There are two modes of operation: Active Snap and Frozen Snap.
| Active Snap | Snap occurs on active desktop (this is the default).
|
| Frozen Snap | Desktop is frozen first, then snapshot is taken subsequently by the user.
|
Refer to Figure 2 for a sample popup menu.
To preview the snapshot, select preview from the popup menu. This opens the most recently snapped image in its true size in a new view window.
Refer to Figure 2 for a sample popup menu.
After selecting the file format and snapping the image, the image can be saved by selecting save icon or save as... from the popup menu. save icon saves the image as an object's file icon (refer to Snapping Icons in VLAB). save as... allows the user to specify the filename to save the image as.
Refer to Figure 2 for a sample popup menu.
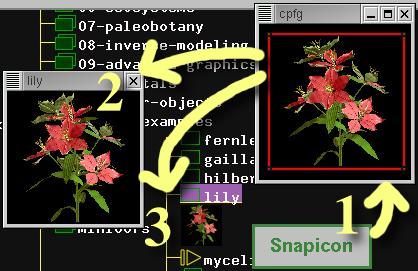
Each object in the OOFS database has an icon. An icon is simply a small snapshot of the model which serves as a quick way to recognize a particular object.
In figure 7 below, the process of snapping an icon is illustrated. Typically, an icon is snapped from a model rendered in CPFG (1). The icon is shown in the Object Manager (2), and is also shown as thumbnails in the Browser (3).
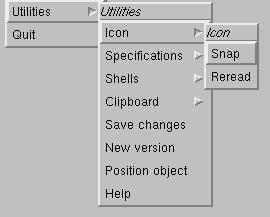
Snapicon can be invoked from the Object Manager's Utilities submenu, which is shown in figure 8 below.
To snap an icon:
Jin Xiao - Implementation, vL1.0
Joanne Penner - Documentation, VL1.0
|
|
VLAB Home |
|
