Location: [CPSC 333] [Listing by Topic] [Listing by Date] [Previous Topic] [Next Topic] Introduction to Structured Design
This page was most recently modified on March 7, 1997
Structured Design is a method to convert an ``informal specification'' including a set of data flow diagrams and process specifications into a design that could be implemented using a language like Pascal or C. It was developed by Edward Yourdon and Larry Constantine, reportedly by examining a number of systems that had been developed in the 1960's that were regarded as good design examples, and identifying common features and patterns that they contained.
Structured Design does not produce designs that have a number of desirable properties:
However, Structured Design does provide usable, maintainable designs for the type of programs (and programming languages) it supports. As well, highly interactive and real time systems often include subsystems that can be developed using this older method, so it may still be useful.
Finally, some of the ideas we'll see by studying this method have been carried forward into some of the more modern design techniques. The newer methods are more complicated and not (yet) as well described as Structured Design, so (one hopes that) this is a useful ``example of a design method'' to study before considering a more modern one.
Structured Design is discussed in Pressman's text, Software Engineering: A Practitioner's Approach. Another more detailed (and very readable) reference is the book by Page-Jones which is on reserve in the library:
M. Page-Jones
The Practical Guide to Structured Systems Design
Second Edition, Prentice Hall (Yourdon Press), 1988
Structured Design can be used to convert a set of data flow diagrams and process specifications into a design specification that includes
More will be said about module specifications later on; we'll start by considering the components of a structure chart.
A module corresponds to a single function or procedure in a language like FORTRAN or Pascal, or to a single function in C or C++ (but, not generally to an ``object'' or "``class'' in C++).
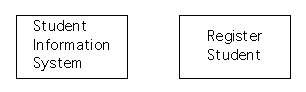
A module is drawn as a rectangle, labeled by the module's name - which should also be a reasonable name for a function or procedure (or, occasionally, subsystem) in the program being developed. Here are two examples.
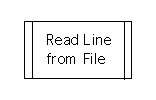
The above notation is used to represent modules for procedures we'll need to develop ourselves. It's also useful (or necessary) to show ``library modules'' that are part of the operating system (or windowing system, or, more generally, software library or libraries) that supports the system we're developing - that is, modules that we don't need to develop ourselves. An extra vertical bar on each side of the rectangle is used to identify these:
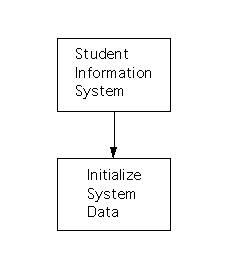
A structure chart includes one main module - the module at the top of the structure chart, which corresponds to the ``main'' part of the program being produced. Each module is connected to all the modules that it calls directly. This connection is shown by having an arrow pointing from the calling module to the module it can call.
This design technique doesn't seem to introduce recursive functions (by itself). However, you certainly might add these as you improve the structure chart at the end of ``architectural design,'' so you might end up drawing an arrow that connects a module to itself, etc.

However, the time the structure chart has been completed, we will have identified a set of interface functions used for all communication between the data area and the rest of the system - that is, we should have completed at least the beginning steps of data design. At that point, the data area (also now called an informational cluster) will be drawn as follows:

The boxes at the top are labeled with the names of each of the interface functions that can be used by the rest of the system to access (or change) the data area that is now shown below them.
In a ``draft'' or ``first cut'' structure chart, you would draw arrows from each one of the modules (in the rest of the system) that could access the data area, down to the top horizontal line in the representation of the data area. In the ``completed'' structure chart, each of these modules (from the rest of the system) must call one or more of the ``interface'' functions - so you'd draw the arrows down to the box (or boxes) for the interface function (or interface functions) that the module calls.
It doesn't ever make sense to show an arrow going up from a data area or informational cluster to another module in the system, because (it's generally the case) that the ``data area'' is passive, and can't call (or, therefore, ``control'') anything else.
You can also use this ``informational cluster'' notation to group together a set of ``interface functions'' that collectively provide access to an I/O device, so that the part of the system that communicates directly with that device - and would need to be modified if that device was replaced - are grouped together, and easy to find.
Unfortunately, you won't find any reference to these ``informational clusters'' in Pressman's books; they're included (in Chapter 7) in Page-Jones' book on Structured Design. I believe they're also a recent addition to the notation and the method, representing a good idea that's been borrowed from object-oriented development - namely, a good extension of this older design technique to facilitate ``information hiding'' (and combine it better with ``data design'').
The structure chart also shows data that can be passed between modules (or between modules and interface functions for data areas or I/O devices). Two symbols are used for data items - one for ``regular'' data items, and another for ``control signals'' - which you can think of as corresponding to someone pushing a button (and which would be drawn on augmented data flow diagrams using dashed arrows, as previously described.
A ``regular'' item is drawn using a short arrow, with a hollow circle at the one end of the arrow (and the arrow head at the other). This is labeled by the name of the data item.
A ``control signal'' is drawn using almost the same symbol: The circle at the end of the arrow is filled in, rather than hollow. It is labeled by the name of the control signal.
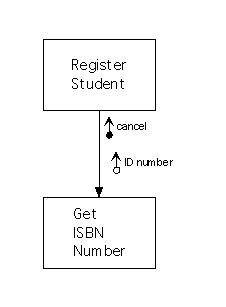
The data flows are drawn close to ("`flowing along'') the connections between modules, or between modules and interface functions, and each point from the module or function sending the data to the module or function receiving it. Each of these connections between modules corresponds to a (possible) procedure call - so you'd generally have data flows down to the called module corresponding to each of the inputs provided by the module calling it, and you'd have data flows back up from the called modules corresponding to each of the outputs that the called module might return.
For example, the following diagram shows that the module ``Register Student'' can call the module ``Get ISBN Number,'' and that ``Get ISBN Number'' can return a control signal, ``cancel,'' and a ``regular'' data item, ``ID number,'' as input. (Yes, this example is nonsensical; the diagram will be fixed as soon as time permits!)
The structure chart does not generally include anything that corresponds directly to the ``Terminators'' on data flow diagrams - that is, to the people or other systems that the system being developed interacts with. It also does not generally include any of the data flows between the system and these terminators.
There is one more symbol that isn't ``standard'' - you might not even find it in Page-Jones' book - but that does seem necessary (and that is, in fact, a standard flow chart symbol) - the Off Page Connector."
If you've run out of room at the bottom of page then, instead of having an arrow down to another module that's to be called, draw the arrow as going down to the top of one of these connectors. Label the connector ``To (name of module you're calling)'' by writing this message inside it, and put the number of the page that will contain the module being called, beside the connector. Show the data flowing to and from the called module beside the arrow to the connector, just as you would if it pointed directly to the module instead.
On the page that contains the called module, show a matching off page connector at the top. Label this with ``From (module that did the calling)'' and put the page number of the module that called this one beside the connector. Draw an arrow from the bottom point of the connector down to the called module and reproduce the data flowing from and back to the calling module along this connection.
With the possible exception of this addition of an ``off page connector,'' the notation described here matches the notation used by Page-Jones exactly, in his book on Structured Design. You can find quite a few examples of structure charts in that book, if you'd like to see a complete one now. A few of these will be appearing in the next pages of online notes.
Structured Design consists of two major steps:
The first step starts with the data flow diagrams and consists of lots of small decisions and tests. The second step provides a way to improve the result of first step (which we don't generally expect to be very good). Since the second step does exist, it isn't necessary to worry too much about how to make some of the decisions in the first step if they aren't clear - you will have an opportunity to improve the structure chart that you create by making these decisions later on.
These steps will be described in more detail, and applied to an example, in the next few pages of these notes.
Location: [CPSC 333] [Listing by Topic] [Listing by Date] [Previous Topic] [Next Topic] Introduction to Structured Design